
 Continuing the Christmas theme these are a couple of cards that Judi of JudiKins sent me.
This stamps is the JudiKins Cone and Needles stamp.
 Continuing the Christmas theme these are a couple of cards that Judi of JudiKins sent me.
 On our website I have created a new SPECIAL OFFER section, this will contain any items that we are overstocked on, at big discounts.

 The Ornament Border and the Merry Christmas have both been stamped with Blending Blox. Vicky then used the Marvy Xtra Fine Silver Metallic Pen to draw the threads and then the 2 wiggly lines that frame the card.
 To create this bracelet we used Translucent Shrink Plastic and a large flower shaped punch.

 There are 10 different Clay Squishers to choose from. For this project we used Das Air Dry Clay but you can also use Polymer Clay or Silver Clay.
 It is best to put something onto the Squisher like olive oil so that the clay easily releases.
 Roll out your clay directly onto the squisher.
 Turn it over and peel back the Squisher.
 Use a cookie cutter in your desired shape. Pull away the excess to reveal your final shape.
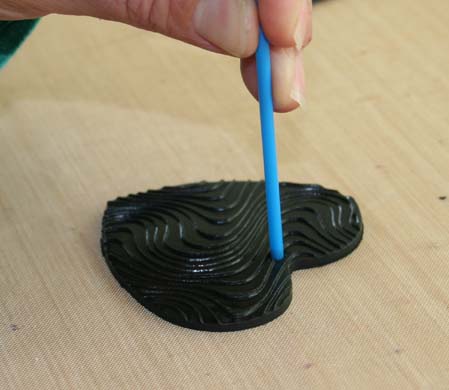 If you are making this into a jewellery piece use a straw to make the hole for the jump ring. Then set aside to dry overnight.
 For colour we applied Mica Gloss using Cut n dry.
 You can either apply a thin layer to the raised bits only or cover the piece completely . . .
 and then use a baby wipe or damp cloth to wipe away the colour from the raised areas.
 This piece of clay we placed inside a Patera pendant and surrounded with micro glass beads.
 This technique is far easier if you do have a melt pot, and I know there are lots of you out there that have one and never use it.
 Start with some Clear Amazing Glaze or UTEE in your melt pot, once this has melted you can then add a regular embossing powder of your choice, or more than one. For this project we chose JudiKins Cabernet Twinkle embossing powder.
 We used our heart mould and placed a head pin in the mould before pouring in the molten liquid.
 Once you've filled the mould then leave to cool, it only takes a few minutes.
 When you turn out your piece this is what it looks like, you will notice that the back of the piece is glossy while the front has a matt finish.
 This is one we made with purple and white.
 These are JudiKins clear pebbles, available in 2 sizes and different colours. Great for highlighting an image on a card but also brilliant for making jewellery.
 Vicky started this project by applying the Blending Blox multi coloured inkpad to glossy card.
 She then stamped over this background with silver encore ink and the JudiKins Splatter Pattern stamp.
 This punch turned out to be the perfect size for the small pebbles. For the large pebble Vicky drew around it and cut it out.
 The bails were then glued onto the back.
 For my pebbles I obviously went with a more purple theme. I created the background with Mica gloss and then stamped the Compass from the Treasures cube.
 These are a few different bangles we have decorated. You can paint them with acrylic paint, Mica Gloss, Cosmic Shimmer and then stamp on them with Stazon. One is even gold leafed.
 To start you need to cover your bangle with a coat of acrylic paint. This gives it a good base.
 Stamp your chosen design on 3 different colours of tissue paper with Archival or Stazon.
 Rip these into random shapes and sizes.
 Water down some PVA glue in a pot and paint onto the bangle in sections, apply the pieces of tissue paper, overlapping slighty. Coat the top of the tissue paper with the PVA.
 Once completed I decided the finished look was a bit too bright so I used some Cut n Dry to apply a thin layer of Mica Gloss Pearl which gave the bangle a nice soft sheen.
 For bling I used the small Artoz sticky gems on two of the flat panels.
 Tim Holtz signed poster from Stampers Anonymous, Tim's book 'A Compendium of Curiosities', Sizzix Alterations Ticket Strip Die and 2 Distressables strips - could all be yours if you :


 This is the DeNami Christmas Block Design stamp which you can find here.